1. Floating Wooden Shelves
Floating wooden shelves are a popular, minimalist decor trend that adds both style and storage to any room. These shelves "float" on the wall without visible brackets, making them an elegant solution for displaying books, plants, and decor items. Best of all, they’re a beginner-friendly project that only requires basic woodworking tools.
Materials Needed:
Wooden boards (choose hardwood like oak or walnut for durability)
Wall brackets or hidden floating shelf brackets
Wood screws
Drill
Sandpaper and wood finish (optional)
How to Build:
Choose Your Wood: Select a sturdy, attractive wood for your shelves. Measure the space on your wall where you want the shelves to be installed, and cut the wood to your desired length and width.
Sand and Finish the Wood: Sand the wood for a smooth surface, and apply a finish if desired. A natural wood stain can enhance the grain and give your shelves a polished look.
Install the Brackets: Locate the studs in your wall and install the floating shelf brackets. For stability, it’s essential to secure the brackets into the wall studs.
Mount the Shelves: Once the brackets are secure, slide the wooden shelves onto them, ensuring everything is level. You can secure the shelves to the brackets with small screws for added stability.
Pro Tip: Floating shelves work well in kitchens, bathrooms, living rooms, or bedrooms to display decor or store essentials.
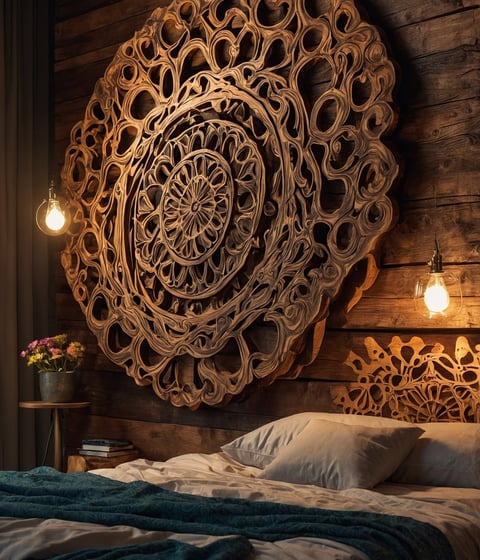
2. Custom Wooden Headboard
A custom wooden headboard is a fantastic way to add character and warmth to your bedroom. Whether you prefer a rustic reclaimed wood look or a sleek, modern design, creating your own headboard allows you to fully personalize the style and size to match your bed and room decor.
Materials Needed:
Wooden planks (reclaimed wood, pine, or cedar work well)
Wood screws and nails
Stain or paint (optional)
Sandpaper
Drill and saw
How to Build:
Measure Your Bed: Start by measuring the width of your bed to determine the size of the headboard. The headboard can be slightly wider than the bed for a dramatic effect.
Cut and Arrange the Planks: Cut your wooden planks to the desired length and arrange them vertically or horizontally. For a rustic look, you can use varying plank sizes and lengths.
Attach the Planks: Join the planks together using horizontal support boards across the back. Secure the planks with wood screws or nails, ensuring they are tightly fastened.
Sand and Finish: Sand the headboard for a smooth touch, and apply a wood stain or paint that complements your bedroom. For a natural look, you can leave the wood untreated or use a clear protective finish.
Mount the Headboard: Attach the headboard directly to the bed frame or mount it on the wall behind your bed using wall brackets or French cleats.
Pro Tip: For a modern twist, incorporate geometric patterns or inlaid designs using different wood tones.
3. Multi-Purpose Wooden Bench
A multi-purpose wooden bench is not only a functional piece of furniture but also a stylish addition to any home. Whether used as an entryway bench with storage underneath or a seat in the dining area, this versatile piece can serve many purposes while showcasing your woodworking skills.
Materials Needed:
2x4 or 2x6 wooden boards for the seat and legs
Screws or wood dowels
Wood glue
Sander and stain (optional)
Drill and saw
How to Build:
Design Your Bench: Determine the bench size based on where you’ll place it. A typical entryway bench is about 18 inches high, 14 inches deep, and 48 inches long.
Cut the Wood: Cut the wooden boards to the appropriate size for the seat, legs, and any additional supports or storage compartments.
Assemble the Bench: Start by attaching the legs to the seat using screws or wood dowels and wood glue for added strength. You can also add a lower shelf or cubbies underneath for shoe storage or baskets.
Sand and Finish: Smooth all surfaces with a sander and apply a protective finish or stain to enhance the wood’s appearance.
Pro Tip: Customize your bench by adding cushions or pillows for extra comfort, or paint it in a bold color to make a statement in your space.
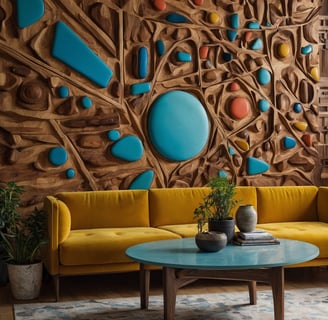
4. Wooden Wall Art
Wooden wall art adds a creative and personal touch to any room. Whether you're creating a simple geometric design, a landscape, or a three-dimensional piece, wooden wall art can be customized to match your decor style. It’s also an excellent project for experimenting with different types of wood, colors, and textures.
Materials Needed:
Wooden panels or scrap wood
Wood glue
Paint or wood stain (optional)
Saw, sander, and measuring tape
How to Build:
Choose Your Design: Decide on the style of wall art you want to create. Geometric patterns, wood mosaics, and abstract designs are popular choices for wooden wall art.
Cut the Wood: Measure and cut the wood into shapes or strips that fit your design. If creating a mosaic, vary the sizes and angles for visual interest.
Assemble the Artwork: Arrange the wood pieces on a wooden backboard or directly on the wall, and secure them with wood glue. Use clamps to hold the pieces in place while the glue dries.
Stain or Paint: Once the wood is securely attached, stain or paint the wood to enhance its natural beauty or add pops of color.
Pro Tip: For a modern look, mix different wood types and finishes to create contrast and depth.
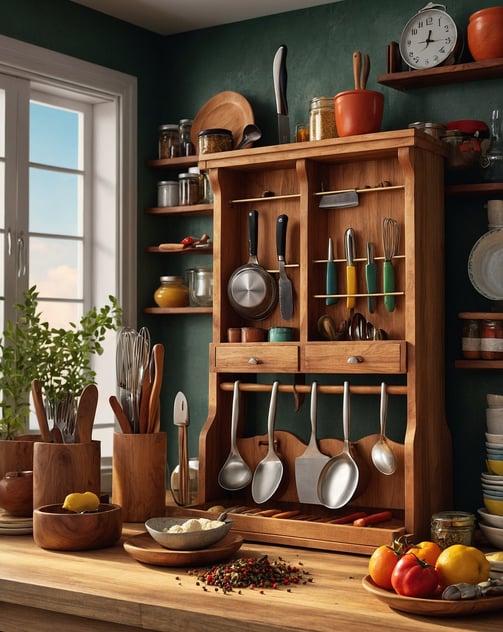
5. Wooden Kitchen Organizer
A wooden kitchen organizer is both a practical and aesthetically pleasing addition to your home. It can help you keep your kitchen clutter-free by organizing utensils, spices, and other small items. Best of all, this project is relatively easy and customizable to fit your specific needs.
Materials Needed:
Wooden boards or plywood (1/2-inch thick is ideal)
Screws and wood glue
Hooks or pegs (optional)
Drill, saw, and measuring tape
Paint or wood stain (optional)
How to Build:
Design Your Organizer: Sketch out a simple design for your kitchen organizer. You can create a wall-mounted spice rack, utensil holder, or combination organizer with shelves, hooks, and slots.
Cut the Wood: Cut the wood to size for the frame, shelves, and compartments. Make sure to measure carefully so everything fits together neatly.
Assemble the Organizer: Attach the shelves and dividers to the frame using screws or wood glue. If adding hooks or pegs for hanging utensils, drill holes where needed and secure them in place.
Finish the Wood: Sand the organizer and apply a stain or paint that complements your kitchen decor.
Mount the Organizer: Attach the organizer to the wall using screws and wall anchors, making sure it is level and securely fastened.
Pro Tip: Add small chalkboard labels or metal baskets to customize the organizer even further.
Conclusion
These five innovative DIY woodworking project ideas for your home offer a great way to enhance your living space with functional, stylish pieces that reflect your personal taste. From the sleek elegance of floating shelves to the charm of custom headboards and artistic wooden wall decor, these projects are perfect for both beginners and experienced woodworkers alike. By following the steps outlined here, you'll be well on your way to creating beautiful, handcrafted pieces that add warmth and individuality to your home.